
Sleepwatchers
SLEEPWATCHERS Devlog
Intro
Last weekend, our team had a blast making SLEEPWATCHERS for Penny De Byl’s Holistic 3D Lockdown Game Jam. We were inspired by the community’s thirst for knowledge and hard work so we figured we would share our experience about how we designed and implemented the look of SLEEPWATCHERS. We will center around game design, audio, visual effects and UI.
Game Design
The first step of every game is design. You have to decide what you’re building. You don’t have to have the entire design of the game mapped out before you start building it, but you should at least have a few core mechanics documented.
The interesting thing about game jams is that there is one very harsh design constraint: time. But everything else is open. So although you have to be very disciplined about time, you can go absolutely crazy in every other way.
So definitely set aside some time for brainstorming and iterating on ideas. Don’t shoot down ideas yet - strive for a “yes, and” approach. For our game, we generated four pages of brainstorming notes before we ran out of ideas. Some of our ideas were terrible, some were great but would take more than a weekend to build, some were good ideas but not everyone was excited about it. We found one that we all liked and decided to move forward with it - Our first design decision.
One thing people tend to overlook in this process is whether or not everyone is excited about the idea. People only do game jams because they’re fun. If someone on your team isn’t excited about the idea you choose, take some time to figure out why, and listen to what they say. It might be that together you can alter the idea, or rearrange your team so that everyone gets to work on things they enjoy.
Once you have your initial idea, take some time to think about what an “MVP” version of your game would look like. Keep stripping away features until it’s no longer a game. Do you need a score? Enemies? Obstacles? Probably not.
In SLEEPWATCHERS, our MVP was:
- Nodes on the screen
- Click near nodes to push them
- Nodes near each other connect
That’s it. Super basic, but it worked.
That gave us a foundation to build on to add other important features one or two at a time as we iterated on our game ideas. It also gave us the flexibility to change directions when something wasn’t working. Features we thought were crucial on Friday afternoon no longer seemed relevant on Monday morning. But new features, like a webcam background or electrified walls, emerged as we iterated.
One thing to keep in mind is that although much of the design occurs at the beginning of the process, you’re designing the entire time. Every decision you make, even the subconscious or “obvious” ones - is a design decision and will affect the overall experience of your game.
Audio
Ah, audio design - the bane of game developers worldwide. But it doesn’t have to be! It's all about your attitude and perspective. Sound effects and game music often get left behind and implemented last in a game (or never implemented at all). What beginner game developers don’t understand is that audio is like a binding agent. It is the glue that ties in all your graphics, special effects, mechanics, etc. and breathes life into them. Try playing SLEEPWATCHERS with audio turned on and off; the difference is striking. When the audio is on, suddenly the game feels different, you see it in a different way because you can hear the textures, effects and gameplay. It places you into the scene.
To effectively use audio in your game, don’t leave it until the end - make time to think about it. Work with sound designers and artists and make sure they have the tools they need to help you create an awesome game experience. If you don’t have a sound artist on your team, take a bit of time to learn about the subject matter, as it will help you implement what you can and also to communicate with an audio artist when one does join your team.
Sound designers and composers can typically work on multiple projects during one game jam, so don’t hesitate to reach out to people who are already attached to a team. You’ll have better luck if you already have a sense of what kind of a mood you’re trying to create and a comprehensive list of sounds that will be required.
You can find royalty-free sound effects of varying quality on a lot of different sites. For this project, we got all our sounds from freesound.org. You have to sign up for an account, but it’s free.
For sound artists, try to give your developers sound effects early, even if they’re not quite right. This gives people an opportunity to playtest with the sounds and gives the developers more time to code and bug test it. It also allows you to get some ideas of how you’d like to alter the sounds to better fit the theme of the game.
For example, in SLEEPWATCHERS, we used the sound of two Lego bricks clicking together for when two nodes connect. It worked ok at first, but once we tried it with the cyberpunk art, it felt too tactile and clacky. We needed something more sci-fi and less realistic.
We used Audacity to layer other tracks on top of the Lego sound. We used the sound of a Faraday cage to get an electric sparking sound, and then added a synthesizer with the pitch bending up to give the sound a positive feel. The players are trying to connect the nodes, so we wanted the sound to communicate success. Just about every sound in the game was edited in this way - several rounds of iteration, getting feedback and adjusting the balance until it felt right.
For the music, we tried out several tracks on Incompetech and MelodyLoops and made a shortlist of tracks that had the right mood but were not too complex. As much as we love intricate melodies, atmospheric tracks tend to work better, especially with puzzle games like this one. We want people coming away from the game talking about how much fun it was, not how great the music was (unless you’re the composer!)
Shaders
TV Static and Webcam Effect
NOTE: You can find the full source code of the shader here and the textures used for it here.
Design-wise, we wanted the player to feel slightly unsettled (or for some, delighted) by seeing themselves when they play the game. Are you watching yourself or are you being watched?
Getting the Webcam feed was actually quite easy. We followed this tutorial and were able to get it to work pretty fast. The code to access the webcam feed was almost a straight copy pasta job:
if (backCam == null)
    backCam = new WebCamTexture();
rend.sharedMaterial.mainTexture = backCam;
rend.sharedMaterial.SetFloat("_IsStatic", 0.0f);
if (!backCam.isPlaying)
    backCam.Play();
We made sure that the code ran when the game started and then set a variable called IsStatic in our material to zero. This is a cheap and easy way to set a bool in a shader. Essentially, we use this technique to switch the shader to a different state: from the menu (displaying a static effect) to the game (displaying the webcam feed). This will make a little more sense when we take a look at the shader that this uses.
NOTE: There’s a better way to do a boolean in a shader but we just didn’t think of it during the jam.
If you’re new to shaders, this stuff might not make much sense. We highly recommend taking Penny’s amazing shader course to get yourself up to speed.
To start exploring the webcam shader, let’s start by looking at the inputs:
Properties
{
    _MainTex ("Main Texture", 2D) = "white" {}
    _TintColor ("Tint Color", Color) = (1,1,1,1)
    _SecondaryTex ("Secondary Texture", 2D) = "black" {}
    _ScrollSpeed ("Scroll Speed", Float) = 8.0
    _NoiseTex ("Noise", 2D) = "white" {}
    _NoiseScrollSpeed("Noise Scroll Speed", Float) = 8.0
    _StaticScrollSpeed("Static Scroll Speed", Float) = 8.0
    _DimStrength ("Texture Strength", Float) = 10
    _IsStatic ("Is Static Texture", Range(0,1)) = 1
}
Main Texture - Depending if we’re in the title screen or the game, this displays either a static texture or the camera feed via our c# code snippet above.
Tint Color - We’ll use this to tint the whole result to get a grungy, dark, hacker look.
Secondary Texture - Adds scan lines which we’ll overlay on top of the webcam feed.
Scroll Speed - The speed at which we animate the scan lines to move downward (to get that old monitor feel)
Noise Texture - Distorts the camera feed over time, giving the webcam footage a fun house feel
Noise Scroll Speed - How fast to animate the noise texture
Static Scroll Speed - How fast the static texture will animate in the main menu
Texture Strength - Dim/lighten the result of the shader. This variable isn’t very well named but game jam amiright?
Is Static Texture - Finally, the “boolean” that we mentioned before. We use this to switch the shader from the main menu mode which shows a static-like effect to the game mode which shows a distorted view of the webcam.
Here’s how those inputs look on the material:

So those are the textures, colors and numbers that the shader receives via the material. Tweaking these has a dramatic effect on how the shader behaves. Let’s look at the frag function in the shader which is where all the action happens:
fixed4 frag (v2f i) : SV_Target
{
     // Sample our noise texture or web cam feed
     fixed4 noise = tex2D(_NoiseTex, i.uv);

     /*
     This is where we use our IsStatic "bool" in a ternary operator. What this does is switch between menu and game mode.
     In the menu mode the main texture (Which at that point is a static tv texture) is animated
     in the horizontal and vertical directions. While in the game mode, the main texture is used but is also distorted by
     by our noise texture over time
     Notice the use of the frac() function, I am finding this to be one of the most useful shader functions,
     it essentially takes a number like 1.2 and spits out only the decimal, leaving you with 0.2
     */
     fixed4 col = _IsStatic > 0.8 ?
         tex2D(_MainTex, float2(i.uv.x * _StaticScrollSpeed + frac(_Time.x/20), i.uv.y + frac(_Time.x/10))) * 1.5:
         tex2D(_MainTex, i.uv + _Time.x * noise.r * _NoiseScrollSpeed);

     // This is where the color of the scan lines get computed
     // They are animated (moved) vertically
     fixed4 secColor = tex2D(_SecondaryTex, half2(i.uv2.x, i.uv2.y + _Time.x * _ScrollSpeed));

     // Applies the tint color to our static/cam feed
     col.rgb *= _TintColor.rgb;

     // Overlays the scan lines over our color so far
     col += secColor/10;

     // Modulates the brightness/dimness of our color
     col.rgb /= _DimStrength;

     // Makes sure our shader works with fog. Honestly this isn't doing anything right now, so ignore it :)
     UNITY_APPLY_FOG(i.fogCoord, col);
     return col;
}
NOTE: the frag() function is essentially operating on pixels. For every pixel that displays your game object, this function runs.
And that’s the shader! Here’s what the final output looks like, quarantine beard and all:
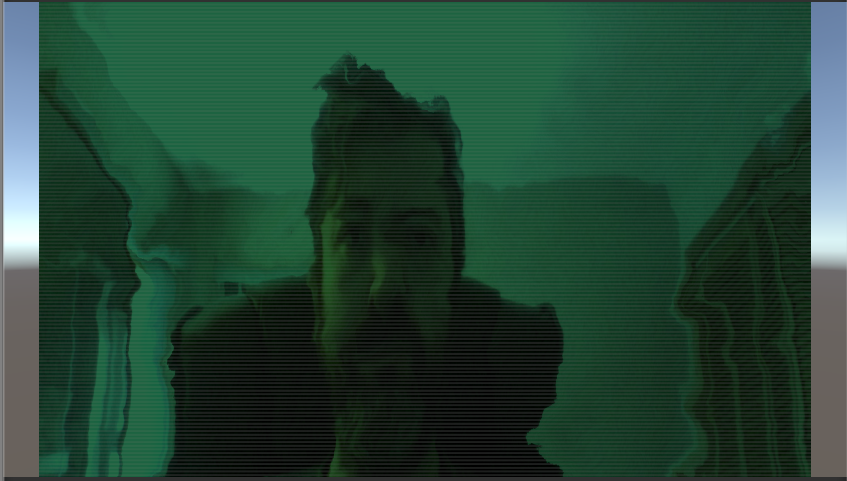
Now if that didn’t make much sense to you, don’t fret, shaders are hard. Really hard. So go back and do some beginner tutorials on them and then come back and try to decipher our ramblings.
NOTE: We purposely scaled in the quad that the camera feed is displayed on to give the feed a janky look. That is why everything looks a bit stretched/squeezed in.
Lastly, we used a shader plugin for the game called Amplify Shader Editor. This plugin allows you to create shaders without coding. We used it to create the enemy’s shader.
Post-Processing
Post-Processing Stack v2
Post-processing can add a lot of flair, style and feeling to your game. It's a great way to give your game that finished look.
We won’t go into detail how to set up post-processing but here’s a youtube tutorial about it.
Let’s start by looking at all the Post-Process effects used for this game:
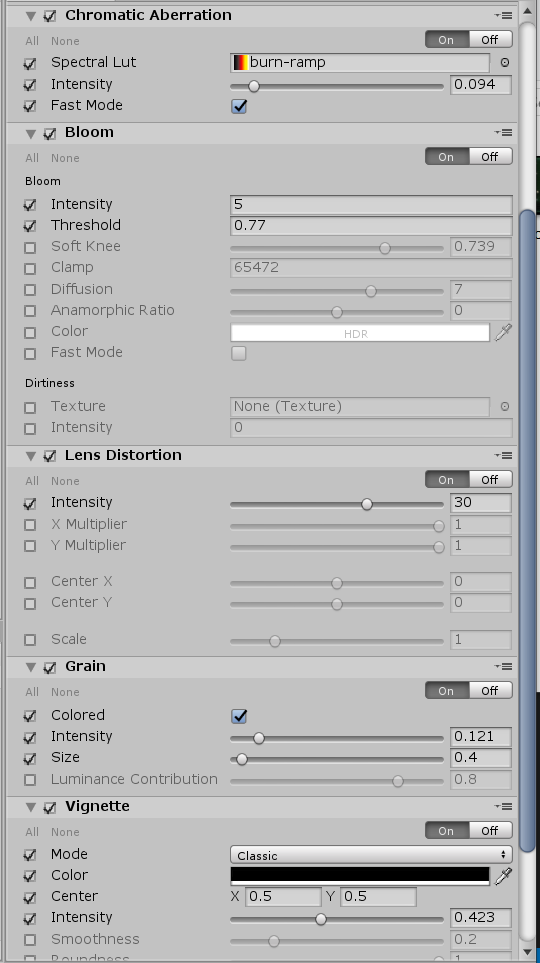
Chromatic Aberration - Gives a cool color offset effect which gets more and more intense at the edges of the camera view.
Bloom - Gives a nice glow to your game. Note that bloom only picks up on bright colors, so if your view is dark, the effect will not be visible.
Lens Distortion - Warps/bends the camera view at the edges. This is what we used to make our game look like an old tv monitor.
Grain - Gives film-like quality to the camera view.
Vignette - Makes the camera view darker at the edges. Very cinematic.
Post-processing effects are fun to play with but make sure you use them responsibly! Getting over-excited with any of the effects can make your game look gaudy. Unless that’s what you want, be tasteful with how strong the effects are. Remember that the end result is to create a feeling for your game - use just enough effects to accomplish that. Sometimes, that means using few and subtle effects.
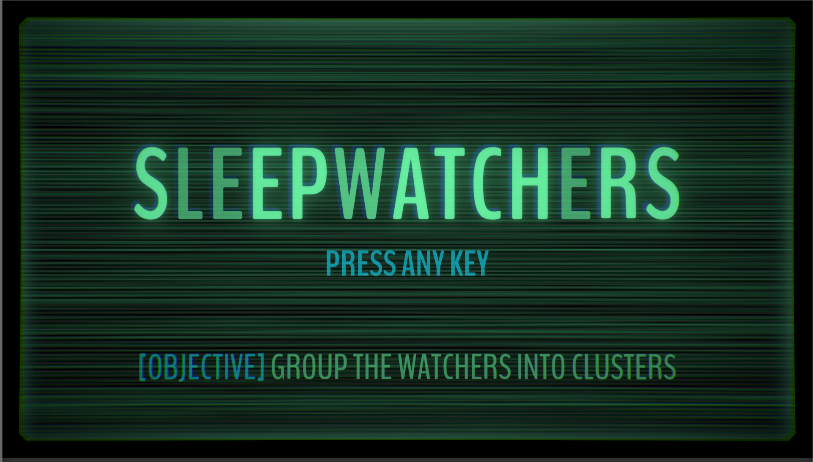
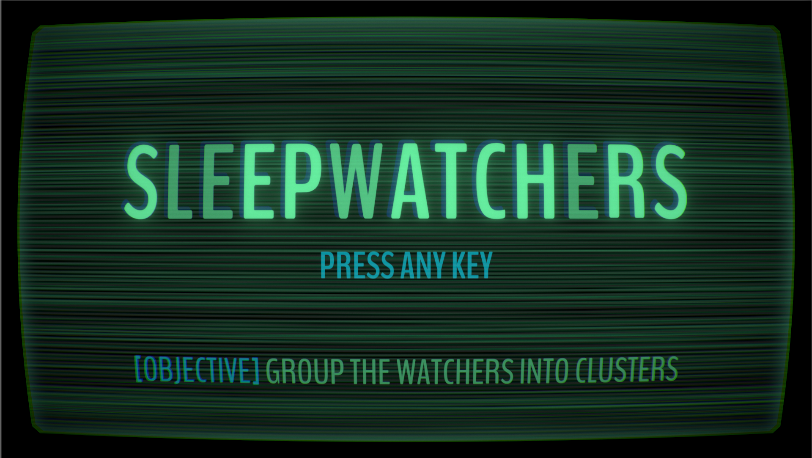
Here’s a screenshot of the game with and without lens distortion:
Keep in mind that, by default, Unity Post-Processing does not affect your UI. You need to set your Canvas to be in “Screen Space - Camera” rendering mode. We didn’t do that in the beginning and had to re-position and re-scale the UI. Don’t be like us.
NOTE: It's not always possible to use post-processing on every game because of the performance hit that it delivers. This is why a lot of mobile games do not make use of it.
Emissive Borders
One effect that really sells the TV monitor look is the brightness at the edge of the screen. This wasn’t technically a post-processing effect but a classic and genius trick. This brightness effect was actually achieved with transparent textures and some quads. Here are the quads used for the menu in the scene view, by themselves:

Games often make use of trickery such as this. As long as the effect does the job, who cares if it's a hacked-in trick? It works!
Particle Effects
Particle effects used for the game include the click effect from the mouse cursor, trails coming out of the patrolling enemies and this effect that happens when a watcher gets destroyed:
Design-wise, we envisioned the watchers to be biomechanical, a mix of flesh and technology, so we did not want a blood gushing effect to happen when one died. Instead we envisioned some kind of static/lighting effect. As you can see, the effect is primarily a texture sheet animation (think flip book) and there are also some explosion embers used.
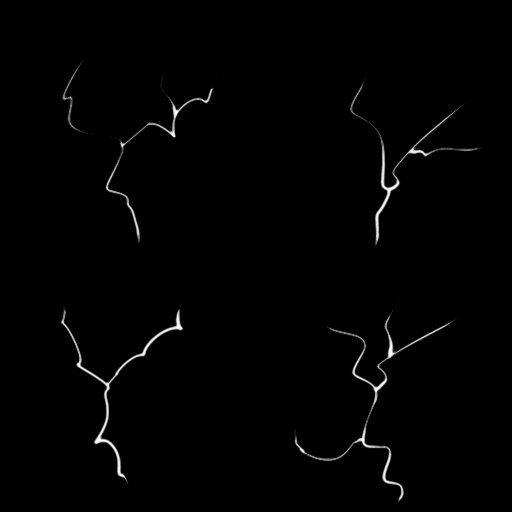
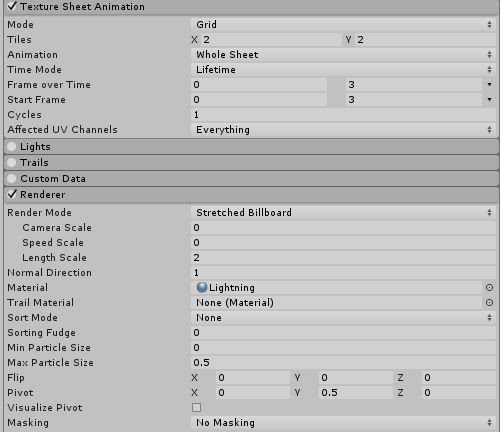
Below are the Particle System parameters and Material settings for the Lightning effect. The texture image is used for both the Albedo and Emission inputs in the Material.

For the ripple effect when the mouse is clicked, we followed this tutorial. We created an image of a white ring with a blur effect using Illustrator, and then used that as a material for the particles. Once the angle was set to 0 and they were laying flat rather than spraying everywhere, we could adjust the other settings to get the ripple effect we wanted.
Design and UI
Typography
Typography, the art of arranging text, is very important for communication as well as establishing a feeling and style for your game. Learning about typography and design has helped us realize how important visual language is, especially when it comes to games. Understanding how to properly and effectively use typefaces, kerning, leading and white space can make a huge difference in player engagement and user experience.
Some things to keep in mind when thinking about typography for your game are usability (being able to read and understand text on different visual backgrounds and various size screens), accessibility (using size, color and contrast for those who are color blind), simplicity (sticking to two or three complimentary typefaces per project), and hierarchy (organizing and styling content based on importance).
If you’d like to learn more about the design side of typography, here is a Udemy course that looks pretty good. “But where do I get fonts!?” we hear you scream. Calm down, my font padawan. You can acquire fonts from all over the web. MyFonts is our favorite site for paid fonts and we’ve used a lot of them for games. Google Fonts is also pretty good for free fonts which is where we got the SLEEPWATCHERS font.
UI Animation
UI doesn’t have to be a static thing in your game. Just like the rest of your game, it can be lively and animated. That is exactly what we did in SLEEPWATCHERS. To make the UI, we used two free plugins:
- TextMeshPro- Allows you way more control over your text than Unity’s built-in UI
- LeanTween - Allows you to animate practically anything in your game through code.

In the menu GIF above, we can see two different animations happening: one for the game logo and another one for the call to action (CTA) text. For the CTA, we're using LeanTween to set the text’s alpha to a low value and then back to its original value at a rapid rate. Here’s what the code for that looks like:
var cg = startText.GetComponent<CanvasGroup>();
LeanTween.alphaCanvas(cg, 0.1f, 0.02f).setLoopPingPong(-1);
First thing to do is grab the CanvasGroup component from the start text. Make sure you put one on in the inspector on your text. It's super useful for managing the alpha of UI Game Objects. Then, use LeanTween to bring the alpha of the text to 0.1. We set this animation to happen every 0.02 seconds. Finally, instruct LeanTween to loop this animation forever with setLoopPingPong(-1). This useful function creates the animation, then does a reverse of the animation and just keeps doing that forever… well until we either tell LeanTween to stop or the script becomes disabled. Be careful with code like this as it makes tweens go on forever and you it can result in memory leaks and console errors. Make good use of LeanTween.Cancel() method which can be used to cancel tweens on specific Game Objects, all tweens or even target specific tweens through an ID. Another useful thing is the LeanTween.tweensRunning variable. Use that to see how many tweens are running at a given time. Great for debugging!
For the logo animation, we are using LeanTween to scale the logo up and down (using ping pong again) and we’re also animating the text’s line spacing (kerning), using the same technique. Notice that some of the letters in the logo are more transparent than others. This is the power of Text Mesh pro, where you can set a lot of settings for individual letters in a string of text. The text in the TextMeshPro component looks like this:
S<color=#6EFFAC58>L</color><color=#6EFFAC58>E</color>EP<color=#6EFFAC78>W</color>ATCH<color=#6EFFAC58>E</color>RS
Notice how we can set a hex color and an alpha value for any letter. It looks ugly as hell but the result is niiiiiiiice. Here’s some documentation on what you can do. Text Mesh Pro is insanely powerful and you can do much more with it. We encourage you to explore this plugin.
Conclusion
Well that’s it for this dev blog post. We hope you got something out of it. Keep making games and don’t give up! Feel free to reach out to us on discord if you have any questions.
Roman Sharf [Vegenator #3602]
Jenna Dancel [jenna #1788]
Deidre Witan [Deia #8469]
Comments
Log in with itch.io to leave a comment.
Thanks!! what an awesome writeup! Going to look back on this a few times.. can definitely attest to always seeming to leave audio last, but then regretting it.. Can't wait to try to implement the camera stuff.. agreed that it definately changed my 'mood' when i clicked to enable and saw myself in the background.. it was so cool though. congrats on this great entry..
Well thanks very much! Glad you found it informative :D